Tuesday, May 15, 2012

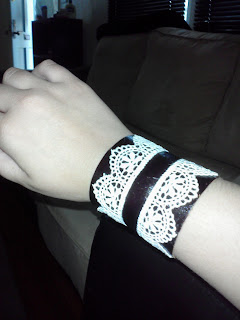
leather and lace

for our next project, we used this site: http://www.urbanthreads.com/pages?id=778

we cut some corners (mostly because we didn't have access to a sewing machine) but they turned out pretty sweet.

First, measure your leather to the size of your wrist.  Then measure out a piece or two of lace just a bit longer than your leather strip (don't worry, it doesn't have to be perfect).


Next, use adhesive spray (the best invention EVER except it smells like horrible chemicals when you breathe it in and will probably kill off some brain cells).  Spray the lace (outside of your living space if possible)...
 and stick it to your leather piece...
Next was the tough part because you have to punch a hole in both sides of the leather so you can attach the snap.  This part was a bit frustrating so we didn't take a picture.  But Rachel figured out the hammering the snap on outside on the pavement worked well.  It will look something like this...
 When you're done snap it onto your wrist and you'll have yourself a snazzy cuff.
Pretty awesome, right?

Sunday, May 13, 2012

Fabric Buttons Making with our guest Shana G.
 Here is what we made, http://thecsiproject.com/2012/03/12/fabric-buttonsms-smartie-pants/


 Go to your local fabric store and pick the coordinating kits of fabric pre-cut in squares or triangles.  We had fun narrowing down our color options.

WARNING, you will be OVERWHELMED by the fabric and color options. DON'T GIVE UP!


 Figuring out how to place in the frame (hint: we found out the hard way, you must measure and insert buttons in advance of choosing your word) Also remember to use the tracer that comes with the kit, to trace how to cut the fabric (I did the inside, because I don't pay attention).


After realizing we can only use the flat back button kits, the button covering commenced!!


We each had our own style of fabric and color scheme.


Emma did: Laugh
Rachel did: Sassy
Shana did: Breathe


Another excuse to use the glue gun (Emma got her own, FINALLY!) . We glued down the awesome letters we found (the backs were not strong enough to stick).


Here is close up of the letters glued on!


Here I am figuring out how to position my letters.


We also bought rhinestones because everyone needs some bedazzle in their life!


Here are the finished products (I swear I didn't meant for mine to look like a sad face)


And now the finished products, in all of their glory....